Executing Custom Quantum Programs
This tutorial guides you through using LunaQ to execute custom quantum programs on quantum hardware. It's designed for individuals with unique quantum algorithms who are looking for a one-stop-shop to access various quantum hardware vendors in a unified way. This step-by-step guide will show you how to deploy these algorithms to quantum hardware providers like IQM.
Before we begin, ensure you have installed the Luna Python SDK along with these additional dependencies:
pip install qiskit matplotlib
Upon completing this tutorial, you will be able to:
- Learn to prepare your quantum circuits.
- Understand how to execute your algorithm on quantum hardware via LunaQ, specifically with IBM Quantum, Q-CTRL's FireOpal, and Amazon Braket.
- Discover how to retrieve and analyze the results from your quantum computation.
1. Quantum Circuit Preparation
To begin, your quantum algorithm must be correctly formatted. Using LunaQ, you can express your algorithm in OpenQASM 3.0, a powerful quantum assembly language for specifying quantum circuits.
We're going to explore this through a basic example using a GHZ (Greenberger-Horne-Zeilinger) state. The GHZ state is a fundamental example in quantum computing, known for demonstrating entanglement across multiple qubits. This type of state is particularly intriguing as it showcases quantum entanglement's unique properties, where a group of qubits exists in a superposition that remains connected regardless of the physical distance between them. Such states are important in areas like quantum communication and quantum error correction.
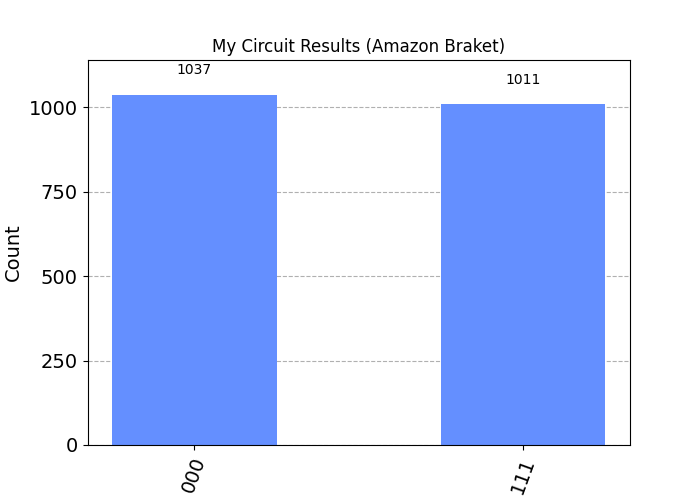
In our example, we’ll construct a three-qubit GHZ state. To achieve this, we'll start by applying a Hadamard gate to the first qubit, creating a superposition. Next, we'll entangle the qubits by applying controlled-NOT (CNOT) gates from the first qubit to the second, and then from the second to the third. This process results in all qubits being interdependent in a way that, upon measurement, all will collapse to either ‘000’ or ‘111,’ revealing the entangled GHZ state.
# Defining a quantum circuit to prepare a GHZ state in OpenQASM 3.0 format:
qasm_str = """// ghz.qasm
    // Prepare a GHZ state
    OPENQASM 3;

    qubit[3] q;
    bit[3] c;

    h q[0];
    cnot q[0], q[1];
    cnot q[1], q[2];

    c = measure q;
    """
2. Executing the Quantum Circuit on Quantum Hardware
After preparing your quantum circuit, the next step is to execute it on actual quantum hardware. LunaQ simplifies this process, offering streamlined access to various quantum hardware vendors, including IQM and many others.
First, you need to initialize LunaQ with your API key. This setup enables communication between your local environment and the Luna platform, facilitating the execution of your quantum circuit on the chosen quantum hardware.
from luna_sdk.controllers.luna_q import LunaQ

# Initialize LunaQ with your API key
lq = LunaQ(api_key="<LUNA_API_KEY>")
With your LunaQ client configured and QPU tokens set, you're ready to submit your quantum circuit for execution. You can choose the quantum hardware provider where you want to run your circuit. This tutorial covers execution on IQM using Amazon Braket, but the process is similar for other providers.
First, you need to set the parameters that also define the Amazon Braket device on which you want to run the circuit. You can find more details about the available hardware here. You can then send your circuit for execution.
from luna_sdk.schemas.qpu_token import QpuToken, TokenProvider

# Set the necessary backend parameters. In this case, we use hardware from IQM provided by Braket.
params = {
        "aws_provider": "IQM",
        "aws_device": "Garnet",
        "shots": 2048,
    }

job = lq.circuit.create(
        circuit=qasm_str,
        provider="aws",
        params=params,
        qpu_tokens=TokenProvider(
            aws_access_key=QpuToken(
                source="inline",
                token="<Your AWS access key>",
            ),
            aws_secret_access_key=QpuToken(
                source="inline",
                token="<Your AWS secret access key>",
            ),
        ),
    )
3. Retrieving Your Results
Given the nature of quantum hardware operations, which can vary in execution time, we've optimized our process to be asynchronous. This means that after you submit your circuit for execution, LunaQ takes care of everything behind the scenes. This setup allows you to focus on other work or projects, while LunaQ is efficiently handling your quantum circuit execution. You can check back at a time that suits you to see the results.
# Retrieve your results once the execution is finished
circuit_result = lq.circuit.get(job)

print(circuit_result)
status=CircuitStatusEnum.DONE
result={
    'measured_qubits': [0, 1, 2],
    'measurement_counts': {'111': 999, '000': 1049},
    'metadata': {'shots': 2048, 'created_at': '2024-12-16T10:03:07.429000Z', 'ended_at': '2024-12-16T10:03:09.304000Z',
    'aws_id': 'arn:aws:braket:us-east-1:105670239841:quantum-task/56e245f5-0303-4c8f-9467-9526f904b7c4',
    'status': 'COMPLETED',
    'failure_reason': None,
    'device_id': 'arn:aws:braket:::device/quantum-simulator/amazon/sv1'}
}
error_message=None
Finally, you can easily visualize these results to reveal the GHZ state.
from qiskit.visualization import plot_histogram

# Retrieve the output of your quantum program
results_braket = lq.circuit.get(job)

# Retrieve the results of your circuits, ignoring any metadata
circuit_results_brakets = results_braket.result['measurement_counts']

# Plot your results from Amazon Braket
plot_histogram(circuit_results_brakets, title="My Circuit Results")
Output:

